Developer Guide
Pied Piper
Pied Piper is a user-friendly task management application tailored for current and future university student leaders. The app helps them stay organised and prepare for real-world situations by helping them manage project groups, and simulate the real world review system. Key features include creating tasks, assigning tasks to team members, setting due dates, rating completed tasks out of 5, and providing feedback through comments. The ability to seamlessly toggle between a person list and task list also helps team leaders easily identify each team members’ roles and their assigned task to complete. Ideal for personal projects and team collaboration, Pied Piper aims to improve productivity and equip university students with valuable skills for their future careers.
Some of our main features:
- Adding tasks with or without due dates.
- Adding team members and assigning them to created tasks.
- Mark tasks as complete and give a rating to gauge the performance of each member.
- Review each member’s overall performances based on the tasks completed.
This user guide provides a broad overview of how the various features work and how to use them properly. We hope you have fun using Pied Piper and may all your future endeavors be elevated with our product!
Table of Contents
- 1. Acknowledgements
- 2. Setting up, getting started
- 3. Design
- 4. Implementation
- 5. Other guides
- 6. Appendix: Requirements
- 7. Manual testing
1. Acknowledgements
- Pied Piper is a brownfield project that builds on AB-3.
- This project is a part of the se-education.org initiative.
The libraries used are as follows:
- Jackson was used for storage.
- JavaFX was used to render the UI.
- PlantUML was used to create UML diagrams.
- JUnit was used to make test scripts for testing.
2. Setting up, getting started
Refer to the guide Setting up and getting started.
3. Design
.puml files used to create diagrams in this document can be found in the diagrams folder. Refer to the PlantUML Tutorial at se-edu/guides to learn how to create and edit diagrams.
3.1 Architecture
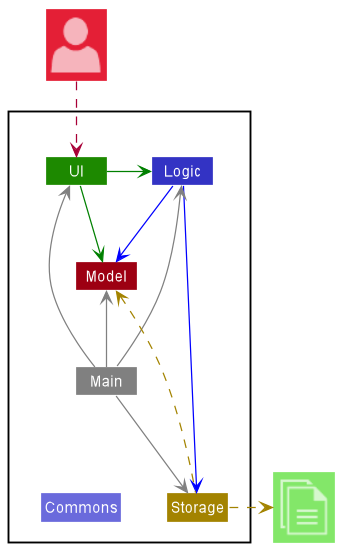
The Architecture Diagram given above explains the high-level design of the App.
Given below is a quick overview of main components and how they interact with each other.
Main components of the architecture
Main has two classes called Main and MainApp. It is responsible for,
- At app launch: Initializes the components in the correct sequence, and connects them up with each other.
- At shut down: Shuts down the components and invokes cleanup methods where necessary.
Commons represents a collection of classes used by multiple other components.
The rest of the App consists of four components.
-
UI: The UI of the App. -
Logic: The command executor. -
Model: Holds the data of the App in memory. -
Storage: Reads data from, and writes data to, the hard disk.
How the architecture components interact with each other
The Sequence Diagram below shows how the components interact with each other for the scenario where the user issues the command delete 1.
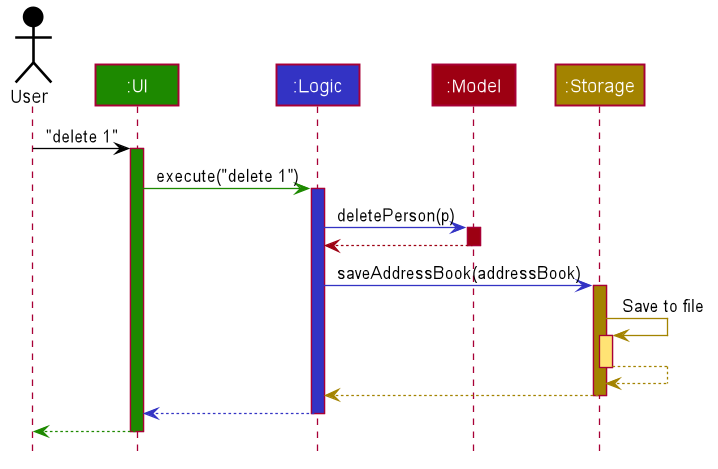
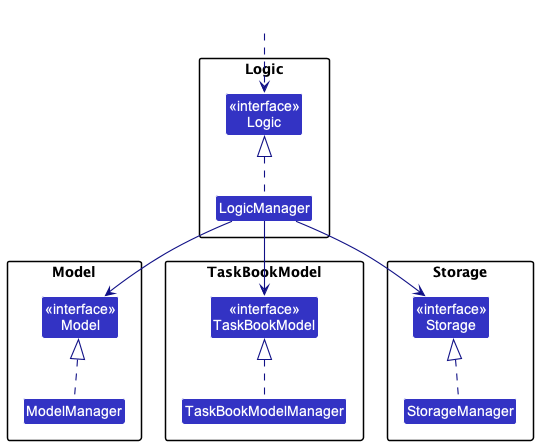
Each of the four main components (also shown in the diagram above),
- defines its API in an
interfacewith the same name as the Component. - implements its functionality using a concrete
{Component Name}Managerclass (which follows the corresponding APIinterfacementioned in the previous point.
For example, the Logic component defines its API in the Logic.java interface and implements its functionality using the LogicManager.java class which follows the Logic interface. Other components interact with a given component through its interface rather than the concrete class (reason: to prevent outside component’s being coupled to the implementation of a component), as illustrated in the (partial) class diagram below.
The sections below give more details of each component.
3.2 UI component
The API of this component is specified in Ui.java
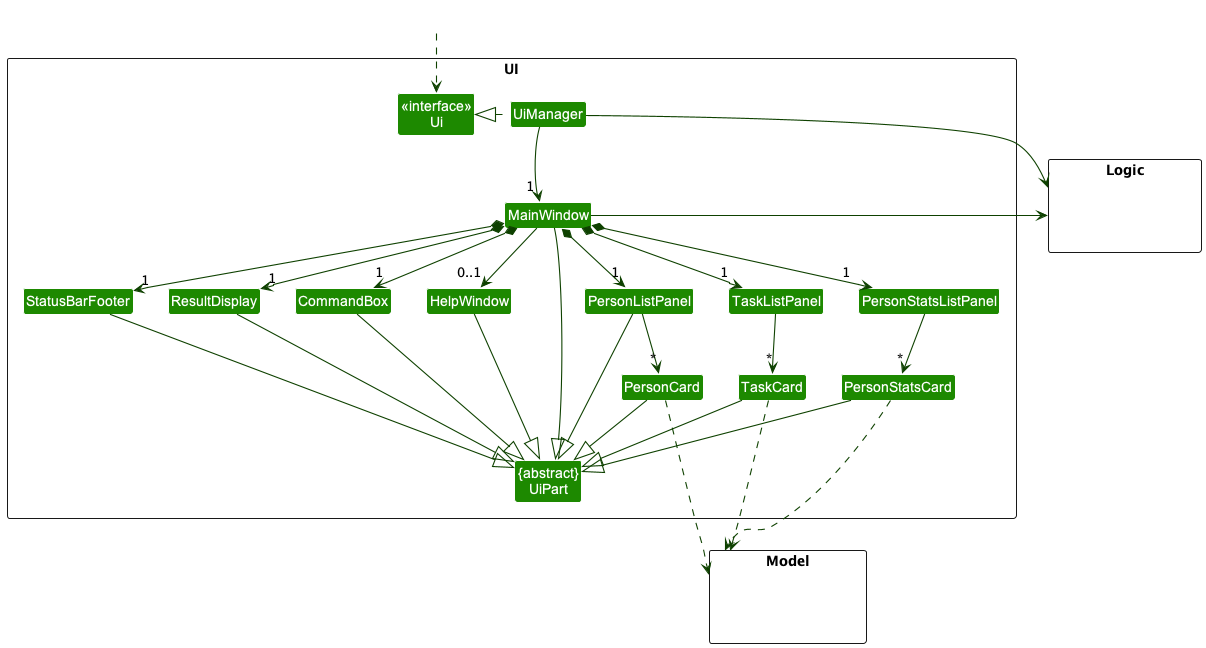
The UI consists of a MainWindow that is made up of parts e.g.CommandBox, ResultDisplay, PersonListPanel, StatusBarFooter etc. All these, including the MainWindow, inherit from the abstract UiPart class which captures the commonalities between classes that represent parts of the visible GUI.
The UI component uses the JavaFx UI framework. The layout of these UI parts are defined in matching .fxml files that are in the src/main/resources/view folder. For example, the layout of the MainWindow is specified in MainWindow.fxml
The UI component,
- executes user commands using the
Logiccomponent. - listens for changes to
Modeldata so that the UI can be updated with the modified data. - keeps a reference to the
Logiccomponent, because theUIrelies on theLogicto execute commands. - depends on some classes in the
Modelcomponent, as it displaysPersonobject residing in theModel.
Note:
- Above describes the UI component for the
PersonList. - For our
TaskList, the way it works is the same, butModelis changed toTaskBookModel, andPersonis changed toTask.
3.3 Logic component
API : Logic.java
Here’s a (partial) class diagram of the Logic component:
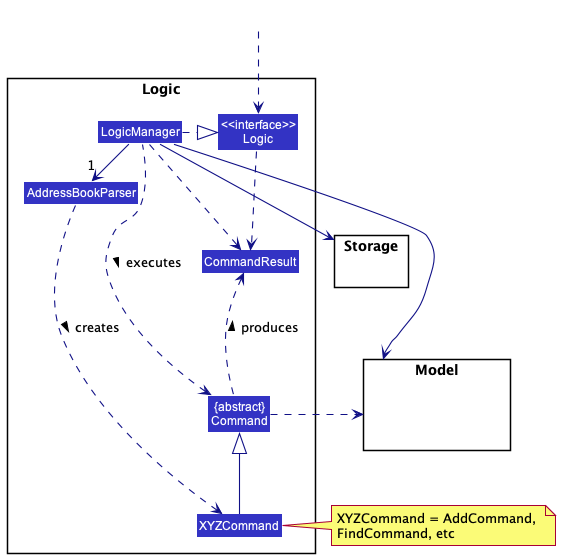
How the Logic component works:
- When
Logicis called upon to execute a command, it uses theAddressBookParserclass to parse the user command. - This results in a
Commandobject (more precisely, an object of one of its subclasses e.g.,AddCommand) which is executed by theLogicManager. - The command can communicate with the
Modelwhen it is executed (e.g. to add a person). - The result of the command execution is encapsulated as a
CommandResultobject which is returned fromLogic.
The Sequence Diagram below illustrates the interactions within the Logic component for the execute("delete 1") API call.
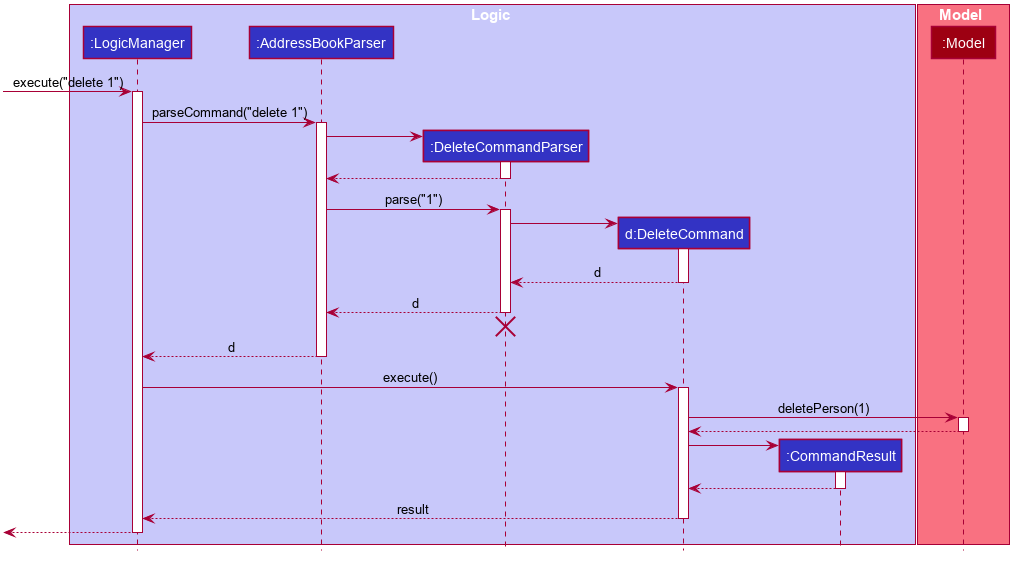
DeleteCommandParser should end at the destroy marker (X) but due to a limitation of PlantUML, the lifeline reaches the end of diagram.
Here are the other classes in Logic (omitted from the class diagram above) that are used for parsing a user command:
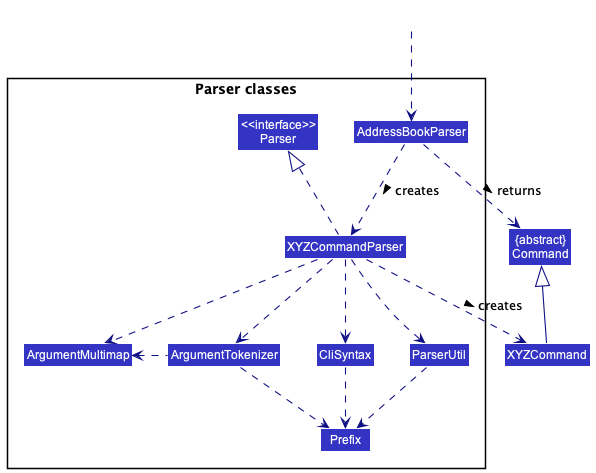
How the parsing works:
- When called upon to parse a user command, the
AddressBookParserclass creates anXYZCommandParser(XYZis a placeholder for the specific command name e.g.,AddCommandParser) which uses the other classes shown above to parse the user command and create aXYZCommandobject (e.g.,AddCommand) which theAddressBookParserreturns back as aCommandobject. - All
XYZCommandParserclasses (e.g.,AddCommandParser,DeleteCommandParser, …) inherit from theParserinterface so that they can be treated similarly where possible e.g, during testing.
Note:
- Our app also has a
TaskBook, which works the same asAddressBook, except that it interacts with the classes that handle tasks, such asTaskBookModelandDeleteTaskCommandParser.
3.4 Model component
API : Model.java
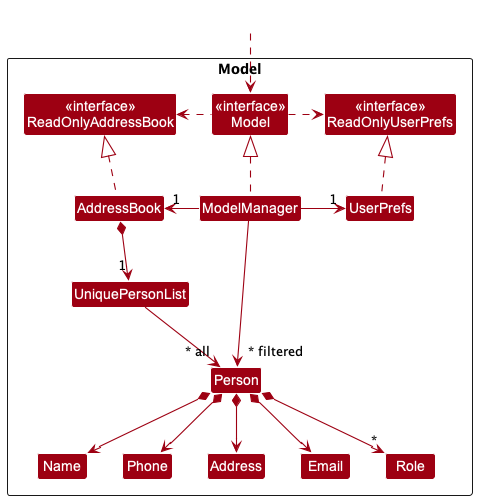
API : TaskBookModel.java
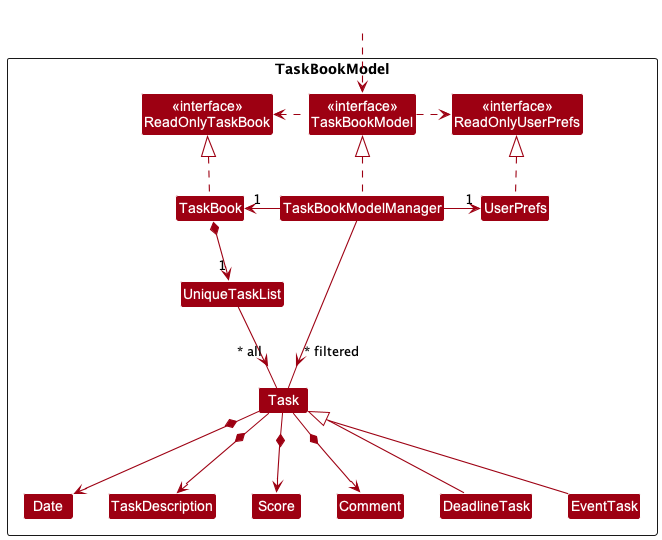
The Model component,
- stores all
Personobjects (which are contained in aUniquePersonListobject). - stores the currently ‘selected’
Personobjects (e.g., results of a search query) as a separate filtered list which is exposed to outsiders as an unmodifiableObservableList<Person>that can be ‘observed’ e.g. the UI can be bound to this list so that the UI automatically updates when the data in the list change. - stores a
UserPrefobject that represents the user’s preferences. This is exposed to the outside as aReadOnlyUserPrefobjects. - does not depend on any of the other three components (as the
Modelrepresents data entities of the domain, they should make sense on their own without depending on other components)
![]() Note:Tasks are handled in a similar way in the
Note:Tasks are handled in a similar way in the TaskBookModel component. It interacts with components like UniqueTaskList and is ‘observed’ as an unmodifiable ObservableList<Task>.
Role list in Pied Piper, which Person references. This allows Pied Piper to only require one Role object per unique role, instead of each Person needing their own Role objects.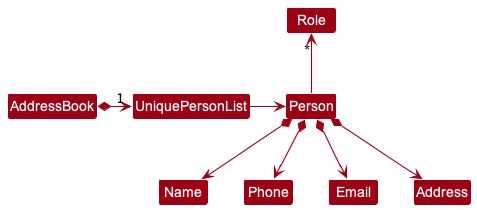
3.5 Storage component
API : Storage.java
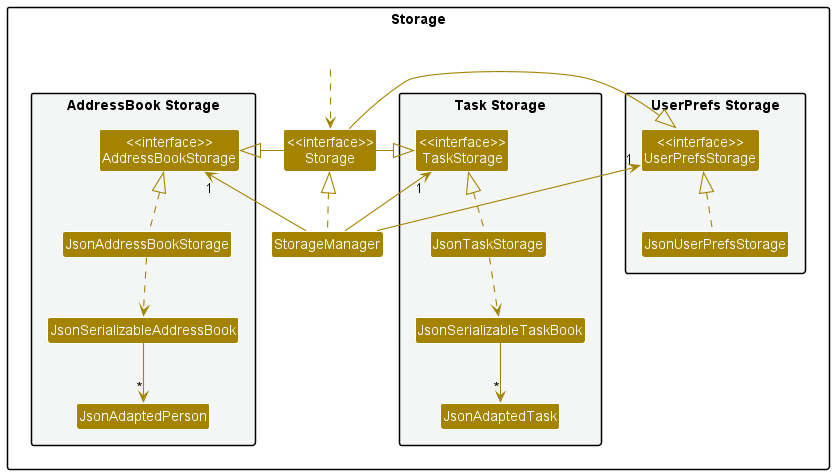
The Storage component,
- can save both address book data and user preference data in json format, and read them back into corresponding objects.
- inherits from both
AddressBookStorage,TaskStorageandUserPrefStorage, which means it can be treated as either one (if only the functionality of only one is needed). - depends on some classes in the
Modelcomponent (because theStoragecomponent’s job is to save/retrieve objects that belong to theModel)
3.6 Common classes
Classes used by multiple components are in the seedu.addressbook.commons package.
4. Implementation
This section describes some noteworthy details on how certain features are implemented.
4.1 Feature implementations
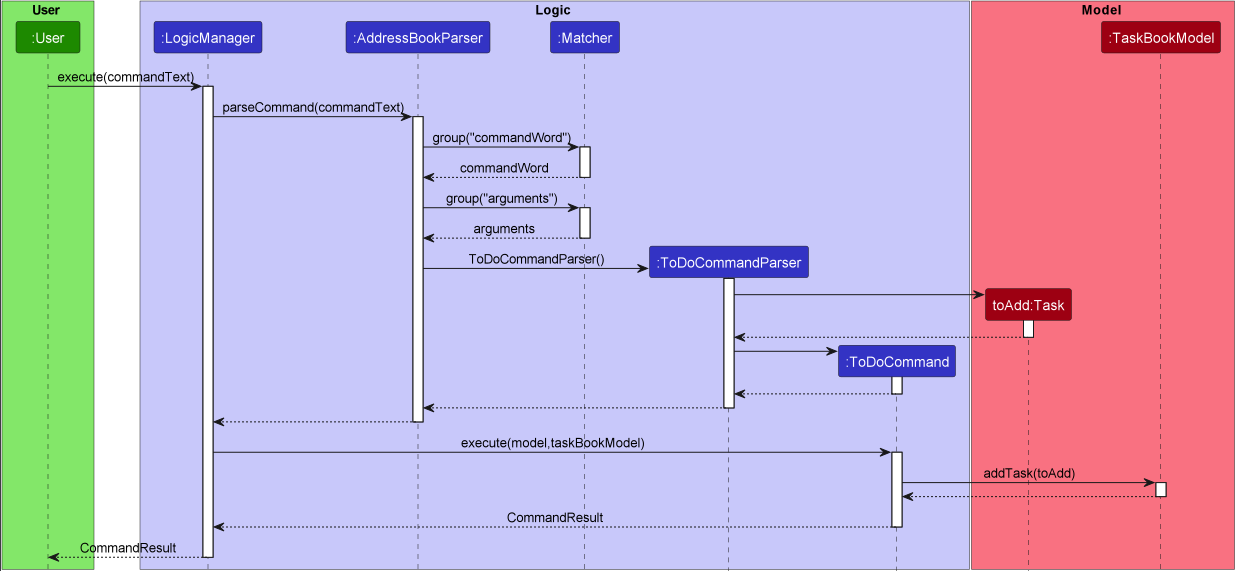
4.1.1 Add Task feature
The implementation of the add task function is facilitated by LogicManager. It takes user input depending on the task user wants to add.
- For a
todotask, the user input consists of 2 arguments, the command word being “todo”. The second argument is a description of the task. - For a
deadlinetask, the user input consists of 3 arguments, the command word being “deadline”. The second argument is a description of the task, and the third argument is the deadline of the task. - For an
eventtask, the user input consists of 4 arguments, the command word being “event”. The second argument is a description of the task, the third argument is the start date of the task, and the fourth argument is the end date of the task.
The format is as follows:
todo task/TASK_DESCRIPTIONdeadline task/TASK_DESCRIPTION by/DEADLINEevent task/TASK_DESCRIPTION from/START_DATE to/END_DATE
Given below is an example scenario and how the adding task function works at each step.
Step 1. The user executes todo task/organise pantry command to add the task in Pied Piper. The command is read by LogicManager, which parses the user’s input into a commandText.
Step 2. LogicManager then calls parseCommand on the commandText in AddressBookParser.
Step 3. AddressBookParser then uses Matcher to group the commandText into commandWord and arguments.
Step 4. A ToDoCommandParser is created, which generates a new toAdd:Task and a new ToDoCommand.
Step 5. LogicManager then calls execute in ToDoCommand, which carries out the addition if the task is valid. It then returns a CommandResult to be displayed to the user to acknowledge whether the addition has taken place.
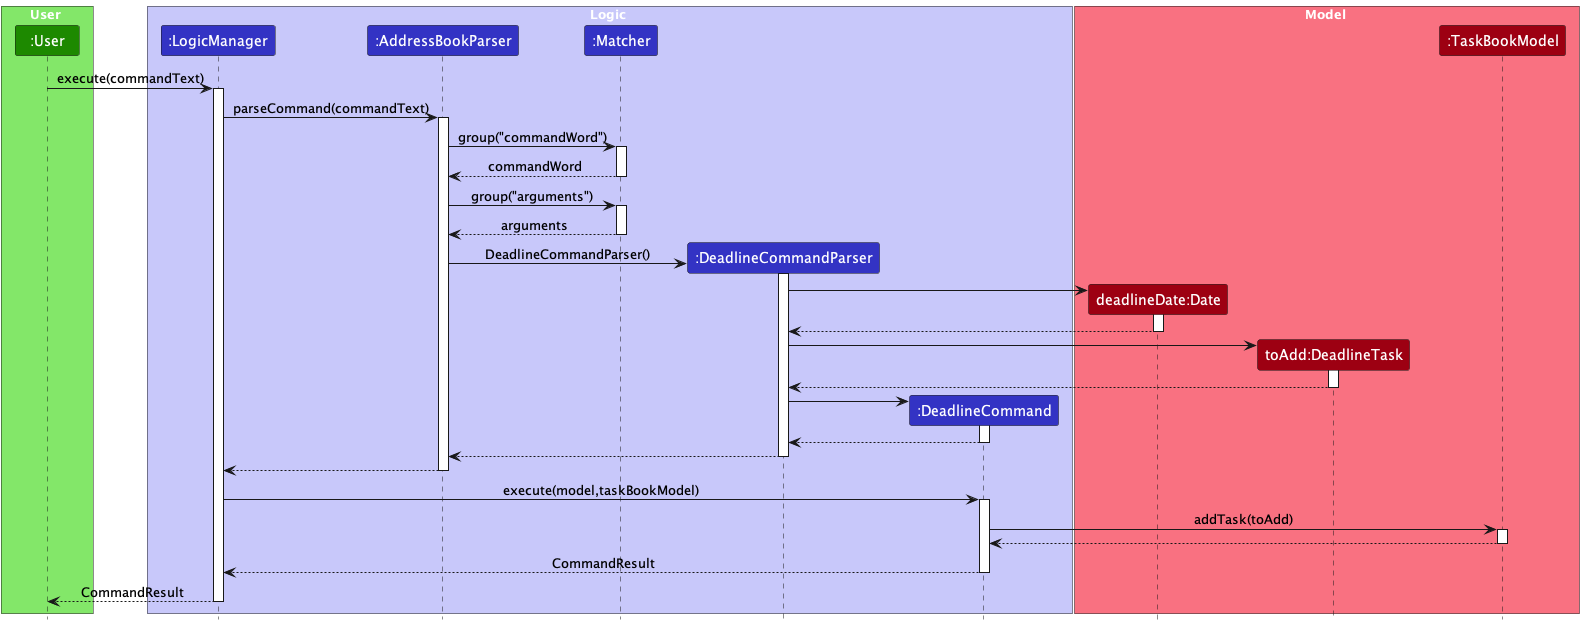
Similarly, the above implementation applies to deadline and event tasks but with different arguments.
![]() Note:The command can only work if a task with the same description is not already present in Pied Piper. Additionally, the above implmentation comes with the
Note:The command can only work if a task with the same description is not already present in Pied Piper. Additionally, the above implmentation comes with the edittask feature, which allows the user to edit the details of a task in the task book.
The following sequence diagram shows how the addition operation works for a TodoTask:
The following sequence diagram shows how the addition operation works for a DeadlineTask:
4.1.2 Add Person feature
The implementation of the add person function is facilitated by LogicManager. It takes user input as 5 arguments, the command word being either add. The second argument is the name, the third argument is the phone number, the fourth argument is the email, and the fifth argument is the address. The role argument is optional and can be added by adding the argument r/ROLE.
The format is as follows:
add n/NAME p/PHONE e/EMAIL a/ADDRESS [r/ROLE]
Given below is an example scenario and how the adding person function works at each step.
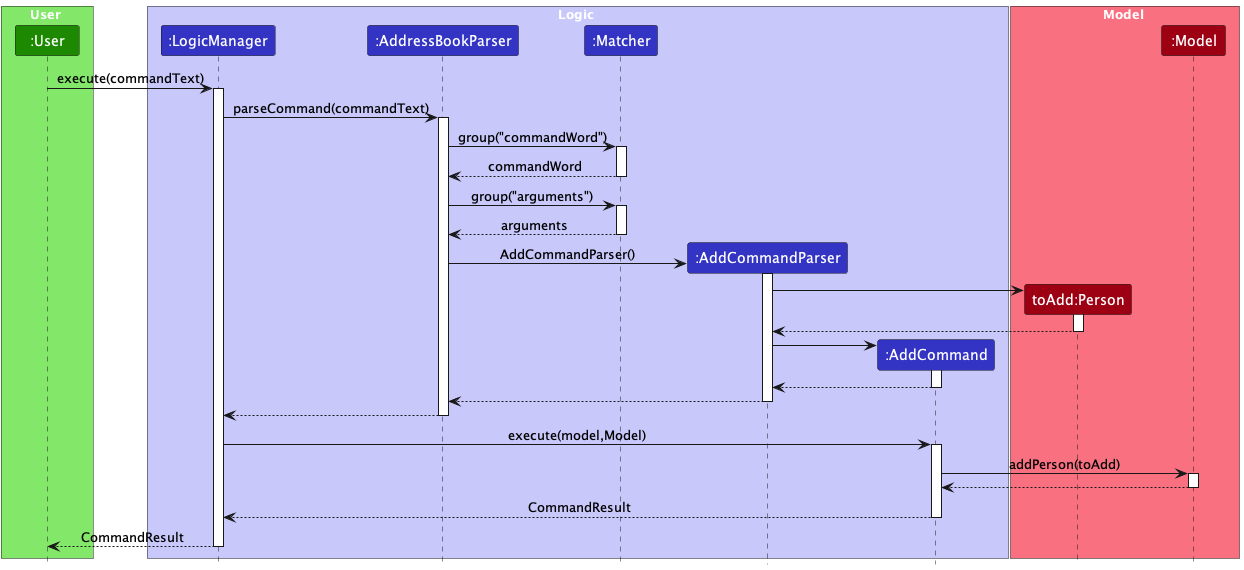
Step 1. The user executes add n/Jane Roe p/98123456 e/janer@nus.com a/Jane street, block 321 r/Member command to add the person in Pied Piper address book. The command is read by LogicManager, which parses the user’s input into a commandText.
Step 2. LogicManager then calls parseCommand on the commandText in AddressBookParser.
Step 3. AddressBookParser then uses Matcher to group the commandText into commandWord and arguments.
Step 4. A AddCommandParser is created, which generates a new toAdd:Person and a new AddCommand.
Step 5. LogicManager then calls execute in AddCommand, which carries out the addition if the person details aer valid. It then returns a CommandResult to be displayed to the user to acknowledge whether the addition has taken place.
![]() Note:The command can only work if a task with the same details is not already present in Pied Piper. Additionally, the above implmentation comes with the
Note:The command can only work if a task with the same details is not already present in Pied Piper. Additionally, the above implmentation comes with the edit feature, which allows the user to edit the details of a person in the address book.
The following sequence diagram shows how the addition operation works:
4.1.3 Delete/deletetask feature
The implementation of the delete/deletetask function is facilitated by LogicManager. It takes user input as 2 arguments, the command word being either delete or deletetask, depending on whether the user wants to delete a person or task respectively. The second argument is an index, denoting the index of the person or task the user wishes to delete.
The format is as follows:
delete PERSON_INDEXdeletetask TASK_INDEX
Given below is an example scenario and how the delete function works at each step.
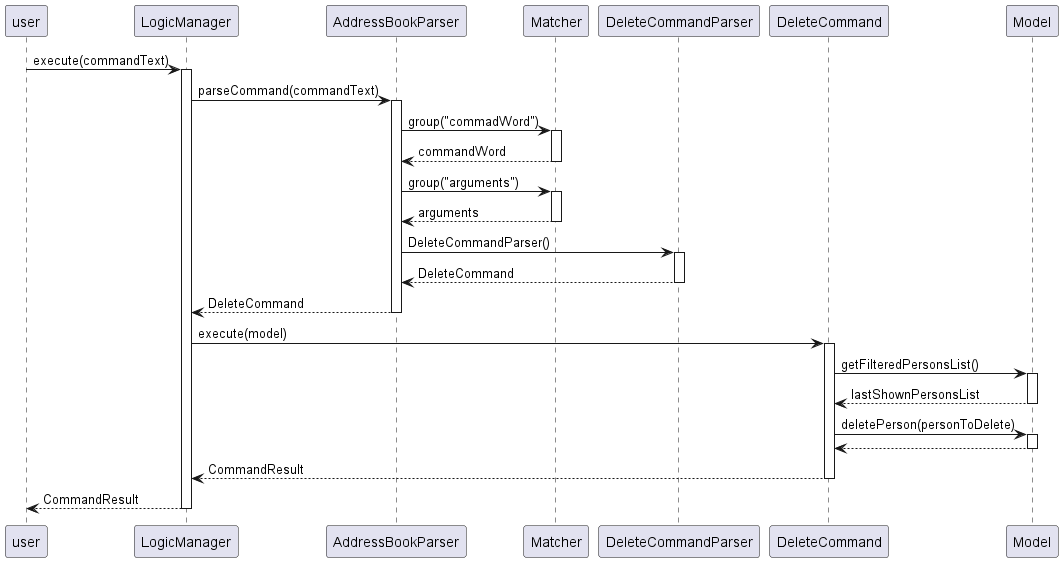
Step 1. The user executes deletetask 1 command to delete the 5th task in Pied Piper. The command is read by LogicManager, which parses the user’s input into a commandText.
Step 2. LogicManager then calls parseCommand on the commandText in AddressBookParser.
Step 3. AddressBookParser then uses Matcher to group the commandText into commandWord and arguments.
Step 4. A DeleteTaskCommandParser is created, which generated a new DeleteTaskCommand.
Step 5. LogicManager then calls execute in DeleteTaskCommand, which carries out the deletion if the task exists. It then returns a CommandResult to be displayed to the user to acknowledge whether the deletion has taken place.
![]() Note:The command can only work if there is at least 1 person or task present in Pied Piper, and the specified index must not be greater than the index of the last item on the list.
In case of deleting a person, all the tasks assigned to that particular person must be handled (unassigned). The same sequence as above applies to the deletion of a person from address book, but the following classes are different:
Note:The command can only work if there is at least 1 person or task present in Pied Piper, and the specified index must not be greater than the index of the last item on the list.
In case of deleting a person, all the tasks assigned to that particular person must be handled (unassigned). The same sequence as above applies to the deletion of a person from address book, but the following classes are different:
-
DeleteTaskCommandParser→DeleteCommandParser -
DeleteTaskCommand→DeleteCommand
The following sequence diagram shows how the delete operation works:
4.1.4 Assign Task feature
The implementation of the assign function is facilitated by LogicManager. It takes user input as 3 arguments,
the command word being assign. The second argument is an task index, denoting the index of task the user wishes to assign.
The third argument is an person index, denoting the index of the person the task is supposed to be assigned.
The format is as follows:
assign t/TASK_INDEX i/PERSON_INDEX
Given below is an example scenario and how the assign function works at each step.
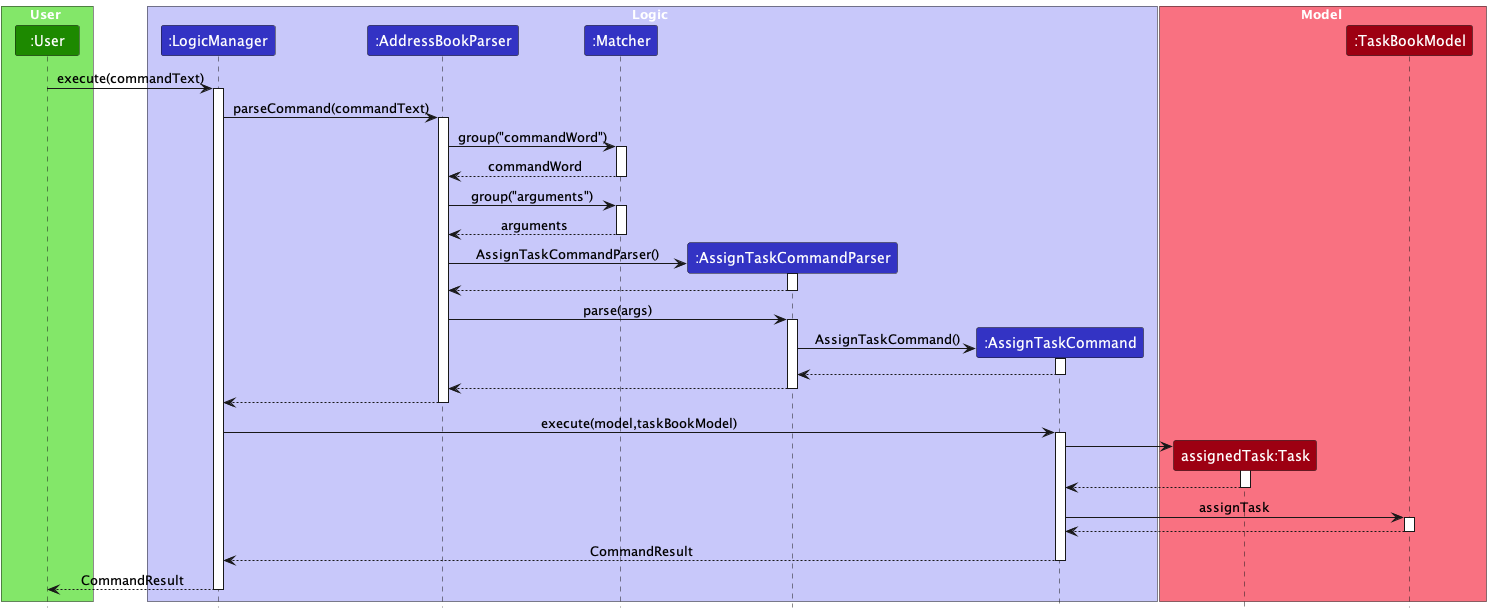
Step 1. The user executes assign t/1 i/2 command to assign the first task in Pied Piper to second person in the address book.
The command is read by LogicManager, which parses the user’s input into a commandText.
Step 2. LogicManager then calls parseCommand on the commandText in AddressBookParser.
Step 3. AddressBookParser then uses Matcher to group the commandText into commandWord and arguments.
Step 4. A AssignTaskCommandParser is created, which generated a new AssignTaskCommand.
Step 5. LogicManager then calls execute in AssignTaskCommand, which carries out the functionality of the command.
This method creates a new Task object with the same description as the task to be assigned, but with the person assigned to it.
This new instance of Task is then replaced with the existing instance in the UniqueTaskList in TaskBook.
It then returns a CommandResult to be displayed to the user to acknowledge whether the assignment has taken place.
![]() Note:Multiple tasks can be assigned to a single person.
The command can only work if the person to be assigned has been given a role.
Note:Multiple tasks can be assigned to a single person.
The command can only work if the person to be assigned has been given a role.
The following sequence diagram shows how the assignment operation works:
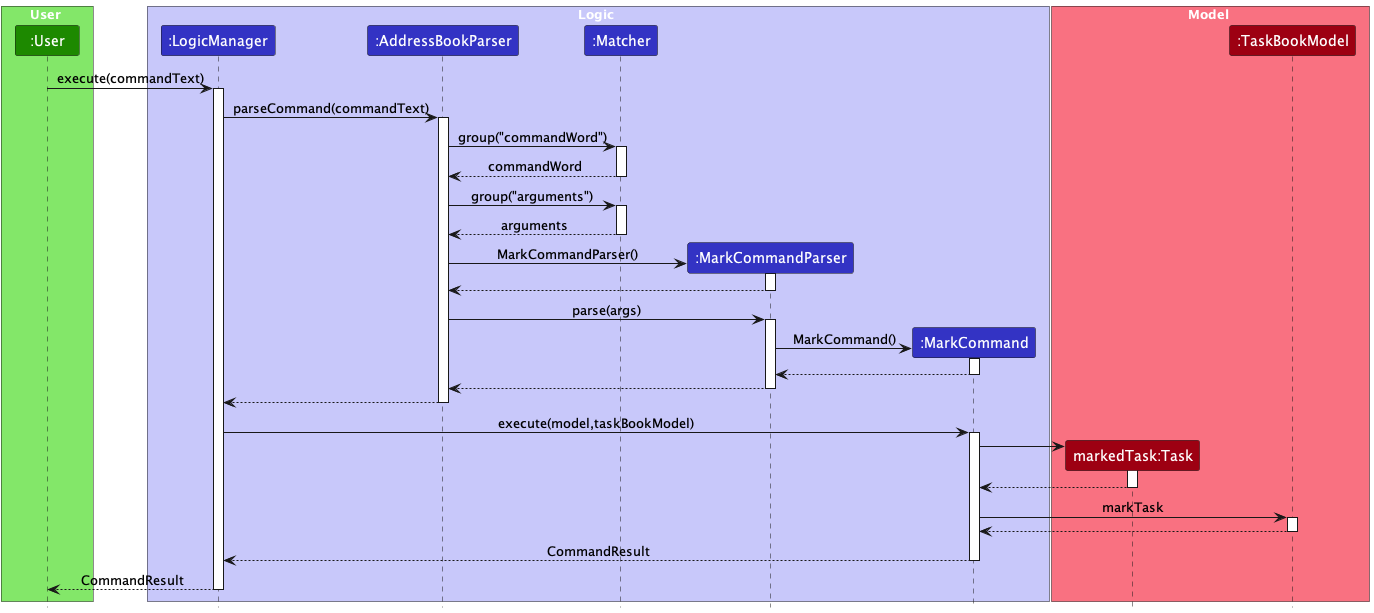
4.1.5 Mark/Unmark Task feature
The implementation of the mark function is facilitated by LogicManager. It takes user input as 3 arguments,
the command word being mark. The second argument is an task index, denoting the index of task the user wishes to mark as complete.
The third argument is an score, denoting the score of the task alloted by the leader.
On the other hand, the implementation of the unmark function takes user input as 2 arguments,
the command word being unmark. The second argument is an task index, denoting the index of task the user wishes to mark as incomplete.
The format is as follows:
mark t/TASK_INDEX s/PERFORMANCE_SCOREunmark t/TASK_INDEX
Given below is an example scenario and how the mark function works at each step.
Step 1. The user executes mark t/1 s/3 command to mark the first task in Pied Piper as complete with a score of 3.
The command is read by LogicManager, which parses the user’s input into a commandText.
Step 2. LogicManager then calls parseCommand on the commandText in AddressBookParser.
Step 3. AddressBookParser then uses Matcher to group the commandText into commandWord and arguments.
Step 4. A MarkCommandParser is created, which generated a new MarkCommand.
Step 5. LogicManager then calls execute in MarkCommand, which carries out the functionality of the command.
This method creates a new Task object with the same description as the task to be marked, but with the status marked as complete.
This new instance of Task is then replaced with the existing instance in the UniqueTaskList in TaskBook.
It then returns a CommandResult to be displayed to the user to acknowledge whether the task has been marked as complete.
![]() Note:Any task cannot be marked if it not assigned to a person. Additionally, the user can mark the task again to give a different score. The score will be updated to the new score.
The implemention of the unmark function is similar to the mark function, except that the status of the task is marked as incomplete.
Note:Any task cannot be marked if it not assigned to a person. Additionally, the user can mark the task again to give a different score. The score will be updated to the new score.
The implemention of the unmark function is similar to the mark function, except that the status of the task is marked as incomplete.
The following sequence diagram shows how the mark/unmark operation works:
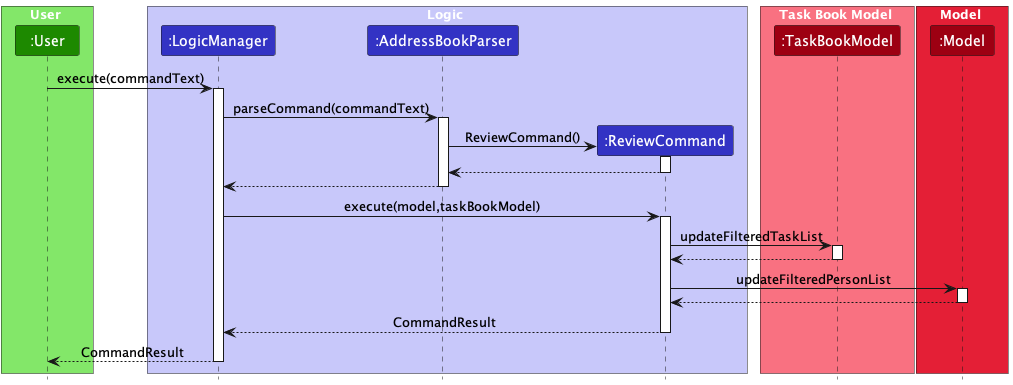
4.1.6 Review feature
The implementation of the mark function is facilitated by LogicManager. It takes user input as 1 arguments,
the command word being review.
The format is as follows:
review
Given below is an example scenario and how the review function works at each step.
Step 1. The user executes review command to mark the first task in Pied Piper as complete with a score of 3.
The command is read by LogicManager, which parses the user’s input into a commandText.
Step 2. LogicManager then calls parseCommand on the commandText in AddressBookParser.
Step 4. A ReviewCommand is created.
Step 5. LogicManager then calls execute in ReviewCommand, which carries out the functionality of the command.
This method goes through the UniqueTaskList in TaskBook and checks for any tasks that are marked as complete, or score is not given. After, it checks for any tasks that are assigned to a person and calculates the average score of the tasks assigned to each person.
It then returns a CommandResult to be displayed to the user to acknowledge whether the averge score of each person has been calculated.
The following sequence diagram shows how the review operation works:
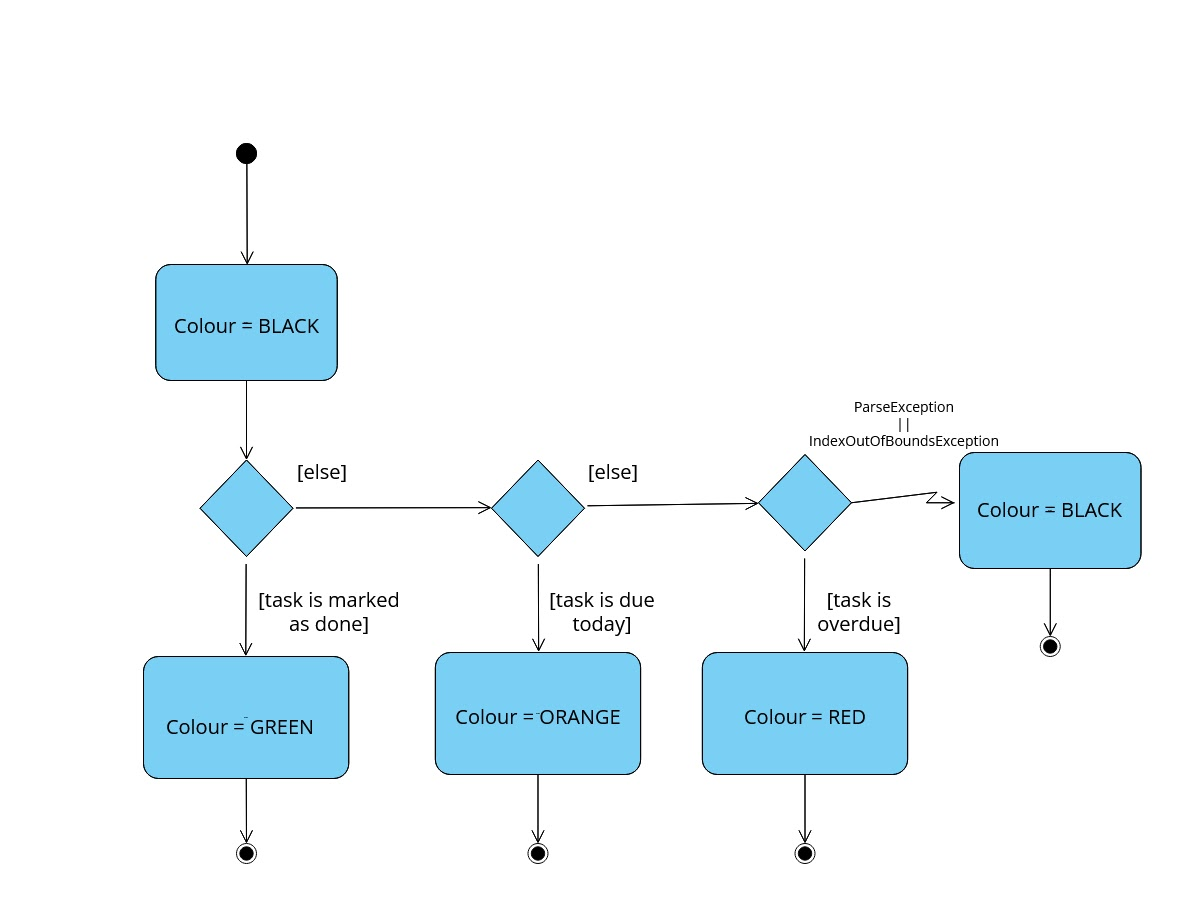
4.1.7 STATUS feature
The implementation of the status feature is facilitated by the setTaskStatus method of TaskCard.
It sets the STATUS UI element to a specific colour depending on the status of the task.
A sequence of steps are followed:
Step 1: Start
Step 2: colour is set to it’s default value: black.
Step 3: setTaskStatus sets the colour to green if the task is marked as done. End.
Step 4: Otherwise it sets the colour to orange if the task is due today. End.
Step 5: Otherwise it sets the colour to red if the task is over due. End.
Step 6: If an error is thrown the colour is set to it’s default colour: black. End.
The following activity diagram shows how the colour is set:
4.2 Proposed implementation of future features:
Aspect: How to undo & redo executes:
-
Alternative 1 (current choice): Saves the entire address book.
- Pros: Easy to implement.
- Cons: May have performance issues in terms of memory usage.
-
Alternative 2: Individual command knows how to undo/redo by
itself.
- Pros: Will use less memory (e.g. for
delete, just save the person being deleted). - Cons: We must ensure that the implementation of each individual command are correct.
- Pros: Will use less memory (e.g. for
Aspect: How to sort my tasks/members:
-
Proposed Implementation (current choice): Display a temporary list of tasks/members sorted by the user’s preference.
- Pros: Better user experience.
- Cons: Difficult to implement in terms of memory usage and different criterias for sorting.
5. Documentation, logging, testing, configuration, dev-ops
6. Appendix: Requirements
6.1 Product scope
Target user profile:
- University Students
- has a need to manage a project with significant complexity
- prefer desktop apps over other types
- can type fast
- prefers typing to mouse interactions
- is reasonably comfortable using CLI apps
Value proposition:
- Adding of various tasks with descriptions.
- Get an overview via the List view so that you can find the event that you need easily.
6.2 User Stories
Priorities: High (must have) - * * *, Medium (nice to have) - * *, Low (unlikely to have) - *
| Priority | As a … | I want to … | So that I can… |
|---|---|---|---|
* * * |
user | create tasks | keep track of the tasks I need to accomplish |
* * * |
user | delete tasks | remove tasks that are outdated or specified incorrectly |
* * * |
user | view each team member’s tasks | have a clear and easily understandable list of what they have to do |
* * * |
user | assign tasks | keep track of who is responsible for which task |
* * * |
user | assign roles | remember the responsibilities of each member |
* * * |
user | create tasks with a deadline | see the due date of the task easily |
* * * |
user | create tasks that are events | keep track of events we conduct as a group |
* * * |
user | comment on tasks | record my feedback for each accomplished task |
* * * |
user | mark a task as completed | have a clear view of what tasks are accomplished |
* * * |
user | unmark a task as uncompleted | undo any possible false marking of tasks |
* * * |
user | assign scores for each completed task | better evaluate overall performance of teammates |
6.3 Use cases
(For all use cases below, the System is Pied Piper and the Actor is the user, unless specified otherwise)
Use case 1: Add a person
MSS
- User requests to list persons
- Pied Piper shows a list of persons
- User requests to delete a specific person in the list
-
Pied Piper deletes the person
Use case ends.
Extensions
-
2a. The list is empty.
Use case ends.
-
3a. The given index is invalid.
-
3a1. Pied Piper shows an error message.
Use case resumes at step 2.
-
Use case 2: Create a task
MSS
- User requests to add a specific task in the list.
-
Pied Piper adds the task.
Use case ends.
Extensions
-
1a. The task already exists.
Use case ends.
-
1a. The given specifications are invalid.
-
1a1. Pied Piper shows an error message.
Use case resumes at step 2.
-
Use case 3: Delete a task
MSS
- User requests to delete a specified task in the list.
-
Pied Piper removes the task.
Use case ends
Extensions
-
1a. The list is empty.
Use case ends
-
1a. The given index is invalid.
-
1a1. Pied Piper shows an error message.
Use case resumes at step 2.
-
Use Case 4: view tasks
MSS
- User requests to view all tasks
-
Pied Piper displays all existing tasks as a numbered list
Use case ends
Extensions
- 1a. No existing tasks
-
1a1. Display message to user that there are no existing tasks
Use case ends
-
Use case: mark a task
MSS
- User requests to mark a specified task in the list with a score.
-
Pied Piper marks the task with a valid score.
Use case ends
Extensions
-
1a. The task is not assigned.
Use case ends
-
1a. The given index is invalid.
-
1a1. Pied Piper shows an error message.
Use case resumes at step 1.
-
6.4 Non-Functional Requirements
- Should work on any mainstream OS as long as it has Java
11or above installed. - Should be able to hold up to 1000 persons without a noticeable sluggishness in performance for typical usage.
- A user with above average typing speed for regular English text (i.e. not code, not system admin commands) should be able to accomplish most of the tasks faster using commands than using the mouse.
- The response to any use action should become visible within 2 seconds.
- The user interface should be intuitive enough for users who are not IT-savvy.
6.5 Glossary
- Mainstream OS: Windows, Linux, Unix, OS-X
- Private contact detail: A contact detail that is not meant to be shared with others
7. Appendix: Instructions for manual testing
Given below are instructions to test the app manually.
7.1 Launch and shutdown
-
Initial launch
-
Download the jar file and copy into an empty folder
-
Double-click the jar file Expected: Shows the GUI with a set of sample contacts. The window size may not be optimum.
-
-
Saving window preferences
-
Resize the window to an optimum size. Move the window to a different location. Close the window.
-
Re-launch the app by double-clicking the jar file.
Expected: The most recent window size and location is retained.
-
7.2 Deleting a person
-
Deleting a person while all persons are being shown
-
Prerequisites: List all persons using the
listcommand. Multiple persons in the list. -
Test case:
delete 1
Expected: First contact is deleted from the list. Details of the deleted contact shown in the status message. Timestamp in the status bar is updated. -
Test case:
delete 0
Expected: No person is deleted. Error details shown in the status message. Status bar remains the same. -
Other incorrect delete commands to try:
delete,delete x,...(where x is larger than the list size)
Expected: Similar to previous.
-
-
{ more test cases … }
7.3 Saving data
-
Dealing with missing/corrupted data files
- {explain how to simulate a missing/corrupted file, and the expected behavior}
-
{ more test cases … }
7.3 Clearing people data
- Clearing data of all people while list of all people is being shown
-
Prerequisites: List all persons using the
listcommand. -
Test case:
clear
Expected: Every person is removed. Status message is displayed.
-
7.4 Editing a person
- Editing details of person
-
Prerequisites: List all persons using the
listcommand. Multiple persons on the list. -
Test case:
edit 1 n/James Lee e/jameslee@example.com
Expected: Person name and email is updated. Status message is shown. -
Test case:
edit 0 n/John Doe p/22224444
Expected: No person is edited. Error details are shown in the status message.
-